Macでlsコマンドの出力結果の文字色を変更する

今回もMacの小ネタ。
Macのターミナルでlsコマンドを使うと、ディレクトリに色を塗ってくれますが、背景色との組み合わせによっては見辛いことがあります。
(具体的に言えば、黒背景で使っている時の通常ディレクトリの青は見辛いです)

これらの色は、 LSCOLORS という環境変数に適切に値を設定することで変更可能です。
設定内容は、 ls コマンドのマニュアル内で検索すると出てきます。

$ man ls
で、マニュアルを開いて、
/LSCOLORS
で検索しましょう。

自分のMacで実行した時の該当部分を載せておきます。

LSCOLORS The value of this variable describes what color to use for which attribute when col-
ors are enabled with CLICOLOR. This string is a concatenation of pairs of the format
fb, where f is the foreground color and b is the background color.

The color designators are as follows:

a black
b red
c green
d brown
e blue
f magenta
g cyan
h light grey
A bold black, usually shows up as dark grey
B bold red
C bold green
D bold brown, usually shows up as yellow
E bold blue
F bold magenta
G bold cyan
H bold light grey; looks like bright white
x default foreground or background

Note that the above are standard ANSI colors. The actual display may differ depend-
ing on the color capabilities of the terminal in use.

The order of the attributes are as follows:

1. directory
2. symbolic link
3. socket
4. pipe
5. executable
6. block special
7. character special
8. executable with setuid bit set
9. executable with setgid bit set
10. directory writable to others, with sticky bit
11. directory writable to others, without sticky bit

The default is “exfxcxdxbxegedabagacad”, i.e. blue foreground and default background
for regular directories, black foreground and red background for setuid executables,
etc.

初期設定はこれです。
exfxcxdxbxegedabagacad

この22文字が、2文字ずつ”文字色””背景色”のペアになっていて、マニュアル中の11種類に対応しています。
最初の ex が directory の配色で、 blue の文字と、デフォルトの背景色です。

これが読みにくいので、 g : cyan あたりに変更するには、
gxfxcxdxbxegedabagacad と設定すれば大丈夫です。

.bash_profile に以下のように設定しておきましょう。


export LSCOLORS=gxfxcxdxbxegedabagacad

濃い青が明るい水色になって(僕の環境では)とても読みやすくなります。

Note that the above are standard ANSI colors. The actual display may differ depending on the color capabilities of the terminal in use.
と注意されている通り、環境によって色は違うので設定を変更するときは試しながら行うことをお勧めします。
例えば今の僕の環境では d : brown は黄色いです。
matplotlibのデフォルトのフォントを変更する

前の記事でmatplotlibで日本語を表示できるフォントをインストールしましたので、
この記事では実際にそのフォントを使う方法を書いておきます。

最初に、デフォルトのフォントのままだと、グラフがどのように表示されるのかを見ておきましょう。


import matplotlib.pyplot as plt
# デフォルトの設定を確認
print(plt.rcParams["font.family"]) # => ['sans-serif']
fig = plt.figure()
ax = fig.add_subplot(111)
ax.plot(range(10),range(10), label="データ1")
ax.plot(range(10),range(0,20,2), label="データ2")
ax.set_title("タイトル")
ax.set_xlabel("x軸のラベル")
ax.set_ylabel("y軸のラベル")
ax.legend()
plt.show()

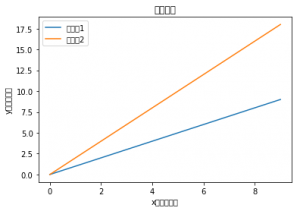
こちらのコードを実行した結果がこの画像です。日本語文字が豆腐のようになります。

これを回避する方法の一つは実行するたびにフォントを指定することです。
このように、font.familyを指定することで、日本語の文字も豆腐にならず表示されます。


import matplotlib.pyplot as plt
plt.rcParams["font.family"] = "IPAexGothic"

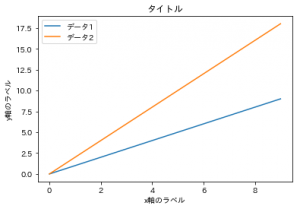
このように指定したあとに、上と同じプログラムを実行すると、下図のように正しく日本語が表示されます。

ただし、これは毎回書くのは結構面倒です。たった1行なのに。
そこで、対応としてmatplotlibの設定ファイルでフォントを指定します。

最初に下記のコードを実行して、設定ファイルの場所を確認します。


>>> import matplotlib
>>> print(matplotlib.matplotlib_fname()) 

環境によって結果は変わりますが、自分の場合は下記の場所にありました。
/Users/<ユーザー名>/.pyenv/versions/anaconda3-5.3.1/lib/python3.7/site-packages/matplotlib/mpl-data/matplotlibrc

このmatplotlibrcのバックアップを取って編集します。
ファイル内に下記の記載があるのでコメントアウトを解除してIPAexGothicを指定します。
元の記述
#font.family : sans-serif
修正後
font.family : IPAexGothic

これで次回以降はフォントの指定をしなくてもmatplotlibで日本語が使えます。

もしうまく表示されない場合はキャッシュファイルを一度削除する必要があります。
matplotlib.get_cachedir()
でキャッシュのディレクトリがわかるので、ここにあるファイルを消して試してみてください。

Mac(Mojave) に pip で mecab-python3をインストールする時にはまった

環境
MacOS Mojave 10.14.2 (OS)
mecab-python3==0.996.1 (入れようとしたライブラリ)

本当はサクッとインストールして使い方について説明するはずだったのに、非常に苦戦したので記録しておきます。
MeCabをpythonから使うために、mecab-python3をインストールしようとしました。
コマンドはサイトに書いてある通り、こちらです。


pip install mecab-python3

これ、自分のや職場のPC,クラウド環境など、過去にいろんな環境で実行してきましたが、今回初めて失敗しました。

まず最初のエラーは、swig が入ってないとのことだったので、Homebrewで入れます。


brew install swig

この後再実行すると、別のエラー。しかもかなりの長文が出て失敗しました。
問題の箇所を抜粋したのがこちらです。


  warning: include path for stdlibc++ headers not found; pass '-std=libc++' on the command line to use the libc++ standard library instead [-Wstdlibcxx-not-found]
  MeCab_wrap.cpp:3051:10: fatal error: 'stdexcept' file not found
  #include 
           ^~~~~~~~~~~
  1 warning and 1 error generated.
  error: command 'gcc' failed with exit status 1

なにかのheaderがないと言われています。
これについて調べた結果、ネット上各所に command Line Toolsの
最新バージョンが問題であると指摘がありました。
ということで、command Line Toolsのバージョンを落とします。
こちらにアクセス
https://developer.apple.com/download/more/

どこまで古いバージョンなら良いのか確信が持てませんでしたが、
試しにXcode 9.4 向けのdmgファイルをダウンロードしてインストールしました。
その後、改めて最初のpipコマンドを打つと無事にpythonからMeCabが使えるようになりました。

pyenvにより発生するようになったHomebrewのWarningに対応する

以前対処した時のメモがあるので記事化しておきます。

Macにpyenvをインストールすると、brew doctorでwarningが出るようになります。

yutaro の部分はそれぞれの環境のユーザー名で読み替えてください。


$ brew doctor
Please note that these warnings are just used to help the Homebrew maintainers
with debugging if you file an issue. If everything you use Homebrew for is
working fine: please don't worry or file an issue; just ignore this. Thanks!

Warning: "config" scripts exist outside your system or Homebrew directories.
`./configure` scripts often look for *-config scripts to determine if
software packages are installed, and what additional flags to use when
compiling and linking.

Having additional scripts in your path can confuse software installed via
Homebrew if the config script overrides a system or Homebrew provided
script of the same name. We found the following "config" scripts:
  /Users/yutaro/.pyenv/shims/icu-config
  /Users/yutaro/.pyenv/shims/libpng16-config
  /Users/yutaro/.pyenv/shims/python3.7-config
  /Users/yutaro/.pyenv/shims/python3.7m-config
  /Users/yutaro/.pyenv/shims/python-config
  /Users/yutaro/.pyenv/shims/python3-config
  /Users/yutaro/.pyenv/shims/ncursesw6-config
  /Users/yutaro/.pyenv/shims/pcre-config

要するに、 PATH の中に、 Homebrewが知らない -config ファイルがあると文句を言っています。
環境変数のPATHを確認すると、.pyenv/shims: が追加されているのでこれが問題です。


$ echo $PATH
/Users/yutaro/.pyenv/shims:/usr/local/bin:/usr/bin:/bin:/usr/sbin:/sbin

対応としては、brewコマンドを実行する時だけ、PATHから、 .pyenvディレクトリを外します。
.bash_profileを開いて、下記のエイリアスを追加します。


alias brew="env PATH=${PATH/\/Users\/yutaro\/\.pyenv\/shims:/} brew"

ターミナルを再起動して、結果が反映されていることを確認します。


$ brew doctor
Your system is ready to brew.

MacにMeCabをインストールする

Mac Book Proに 形態素解析ソフトのMeCabをインストールします。

homebrewを導入済みであれば簡単です。
ソフトウェア本体と、IPA辞書を順番にインストールします。


brew install mecab
brew install mecab-ipadic

入ったらテストしましょう。mecabコマンドで起動したあと、形態素解析したい文章を入力します。


~$ mecab
すももももももものうち
すもも	名詞,一般,*,*,*,*,すもも,スモモ,スモモ
もも	名詞,一般,*,*,*,*,もも,モモ,モモ
も	助詞,係助詞,*,*,*,*,も,モ,モ
もも	名詞,一般,*,*,*,*,もも,モモ,モモ
の	助詞,連体化,*,*,*,*,の,ノ,ノ
うち	名詞,非自立,副詞可能,*,*,*,うち,ウチ,ウチ
EOS

終了は Ctrl + d です。