前回に引き続いて、Amazon Rekognitionの話です。
Rekognitionでは顔だけでなく、画像に写っている物体やシーンについてのラベル情報を得ることができます。
参考: オブジェクトおよびシーンの検出 – Amazon Rekognition
boto3で使う方法は、顔検出の時とよく似ていて、
detect_faces() の代わりに、 detect_labels() を呼び出すだけです。
参考: Rekognition — Boto3 Docs 1.17.95 documentation
サンプルとして、ドキュメントに掲載されている車の並んだ道でスケーボーやっている人の画像(ファイル名: skateboard.jpg)でやってみます。
顔検出の場合と同様にローカルの画像ファイルを読み込む方法と、S3にアップロードされた画像を使う方法があります。
ローカルのファイルを使う場合は次のようにします。
import boto3

with open("./skateboard.jpg", "rb") as f:
    img = f.read()

client = boto3.client('rekognition')
response = client.detect_labels(Image={'Bytes': img})
S3にアップロードしたデータを使う場合は次のようにします。
client = boto3.client('rekognition')
response = client.detect_labels(
    Image={
        'S3Object': {
            'Bucket': '{バケット名}',
            'Name': 'skateboard.jpg',
        }
    },
)
結果は辞書型で戻ってきます。
キー: Labels の値がメインの結果です。
response.keys()
# dict_keys(['Labels', 'LabelModelVersion', 'ResponseMetadata'])
Labels の値は、検出できたものの配列になっています。
試しに二つほど表示すると次のようになります。
import json

print(json.dumps(response["Labels"][4], indent=4))
"""
{
    "Name": "Person",
    "Confidence": 98.37577819824219,
    "Instances": [
        {
            "BoundingBox": {
                "Width": 0.1903613954782486,
                "Height": 0.27238351106643677,
                "Left": 0.43754446506500244,
                "Top": 0.3520295023918152
            },
            "Confidence": 98.37577819824219
        },
        {
            "BoundingBox": {
                "Width": 0.037608712911605835,
                "Height": 0.06765095144510269,
                "Left": 0.9162867665290833,
                "Top": 0.50001460313797
            },
            "Confidence": 86.00637817382812
        }
    ],
    "Parents": []
}
"""
print(json.dumps(response["Labels"][6], indent=4))
"""
{
    "Name": "Pedestrian",
    "Confidence": 97.18687438964844,
    "Instances": [],
    "Parents": [
        {
            "Name": "Person"
        }
    ]
}
"""
Name にラベル名が格納され、 Instances にそれが画像のどこに含まれていたが示されています。
Instances は空の配列のこともあります。要するに画像のどこかに写っているけど、場所は不明ということです。
位置が出力されるものとそうでないものにどんな規則性があるのかはいまいちわかりませんでした。
このほか、Parentsという属性があり、親概念になるラベル名が取得されます。
さて、検出されたラベル名と、 Instances の数、 Parentsの一覧を出力してみましょう。
結構色々検出されていますね。
for label in response["Labels"]:
    print(f'ラベル名: {label["Name"]}', f'インスタンス数: {len(label["Instances"])}')
    if len(label["Parents"]) > 0:
        print(f'親ラベル: {label["Parents"]}')


"""
ラベル名: Car インスタンス数: 14
親ラベル: [{'Name': 'Vehicle'}, {'Name': 'Transportation'}]
ラベル名: Automobile インスタンス数: 0
親ラベル: [{'Name': 'Vehicle'}, {'Name': 'Transportation'}]
ラベル名: Vehicle インスタンス数: 0
親ラベル: [{'Name': 'Transportation'}]
ラベル名: Transportation インスタンス数: 0
ラベル名: Person インスタンス数: 2
ラベル名: Human インスタンス数: 0
ラベル名: Pedestrian インスタンス数: 0
親ラベル: [{'Name': 'Person'}]
ラベル名: Skateboard インスタンス数: 1
親ラベル: [{'Name': 'Sport'}, {'Name': 'Person'}]
ラベル名: Sport インスタンス数: 0
親ラベル: [{'Name': 'Person'}]
ラベル名: Sports インスタンス数: 0
親ラベル: [{'Name': 'Person'}]
ラベル名: Road インスタンス数: 0
ラベル名: Wheel インスタンス数: 10
親ラベル: [{'Name': 'Machine'}]
ラベル名: Machine インスタンス数: 0
ラベル名: Path インスタンス数: 0
ラベル名: Downtown インスタンス数: 0
親ラベル: [{'Name': 'City'}, {'Name': 'Urban'}, {'Name': 'Building'}]
ラベル名: City インスタンス数: 0
親ラベル: [{'Name': 'Urban'}, {'Name': 'Building'}]
ラベル名: Urban インスタンス数: 0
ラベル名: Building インスタンス数: 0
ラベル名: Town インスタンス数: 0
親ラベル: [{'Name': 'Urban'}, {'Name': 'Building'}]
ラベル名: Tarmac インスタンス数: 0
ラベル名: Asphalt インスタンス数: 0
ラベル名: Parking Lot インスタンス数: 0
親ラベル: [{'Name': 'Car'}, {'Name': 'Vehicle'}, {'Name': 'Transportation'}]
ラベル名: Parking インスタンス数: 0
親ラベル: [{'Name': 'Car'}, {'Name': 'Vehicle'}, {'Name': 'Transportation'}]
ラベル名: Intersection インスタンス数: 0
親ラベル: [{'Name': 'Road'}]
ラベル名: Architecture インスタンス数: 0
親ラベル: [{'Name': 'Building'}]
ラベル名: Office Building インスタンス数: 0
親ラベル: [{'Name': 'Building'}]
ラベル名: Sidewalk インスタンス数: 0
親ラベル: [{'Name': 'Path'}]
ラベル名: Pavement インスタンス数: 0
親ラベル: [{'Name': 'Path'}]
ラベル名: Neighborhood インスタンス数: 0
親ラベル: [{'Name': 'Urban'}, {'Name': 'Building'}]
ラベル名: Street インスタンス数: 0
親ラベル: [{'Name': 'City'}, {'Name': 'Road'}, {'Name': 'Urban'}, {'Name': 'Building'}]
ラベル名: Coupe インスタンス数: 0
親ラベル: [{'Name': 'Sports Car'}, {'Name': 'Car'}, {'Name': 'Vehicle'}, {'Name': 'Transportation'}]
ラベル名: Sports Car インスタンス数: 0
親ラベル: [{'Name': 'Car'}, {'Name': 'Vehicle'}, {'Name': 'Transportation'}]
ラベル名: Sedan インスタンス数: 0
親ラベル: [{'Name': 'Car'}, {'Name': 'Vehicle'}, {'Name': 'Transportation'}]
"""
結果が多すぎる場合は、 MaxLabels 引数で出力される結果の数を絞り込むこともできます。
さて、ラベル名の一覧だけみてもどのくらい正確なのかわかりにくいので、画像中に図示してみましょう。
インスタンス数が0のものは、図示できないので、インスタンスが返されたものだけ、ボックスを描いていきます。
# %%pycodestyle
import matplotlib.pyplot as plt
from matplotlib import patches
from skimage import io

# matplotlibの可視化用に画像の読み込み
img_array = io.imread("./skateboard.jpg")

# 画像の高さと幅の取得
image_h, image_w, _ = img_array.shape

fig = plt.figure(facecolor="w", figsize=(12, 12))
ax = fig.add_subplot(111)
# 元の画像を表示する
ax.imshow(img_array)

for label in response["Labels"]:
    for instance in label["Instances"]:
        left = instance["BoundingBox"]["Left"] * image_w
        top = instance["BoundingBox"]["Top"] * image_h
        width = instance["BoundingBox"]["Width"] * image_w
        height = instance["BoundingBox"]["Height"] * image_h
        patch = patches.Rectangle(
            xy=(left, top),
            width=width,
            height=height,
            fill=False,
            ec="c",
            linewidth=2
        )
        ax.add_patch(patch)
        ax.text(x=left, y=top, s=label["Name"], fontsize=15, c="b")
出力された結果がこちらです。
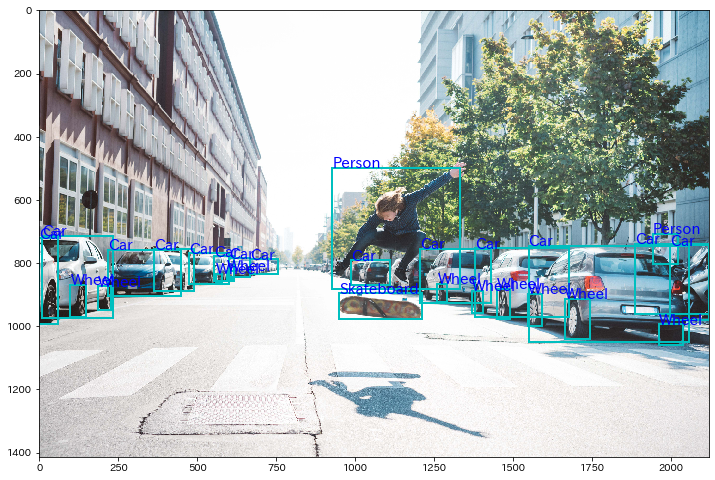
人や車などの位置がしっかり検出できていますね。